Today’s youth remains mainly focused on internet connections’ utility for a smooth life. Considering the dependency of the 21st-century generation folks on the internet, it is essential to choose a reliable internet source in the first place. Starlink Ridgeline mount can be a stable source of internet in that case. The Starlink Ridgeline mount has many advantages regarding network stability and material durability. However, most people complain about the long wait list and considerably higher prices of Starlink.
Contents
- Understanding Starlink Internet and uses of Mounting Solutions
- Starlink Ridgeline Mount Overview
- Starlink Ridgeline Mount Installation Process and Considerations
- Tips for Optimal Placement and Alignment of Starlink Ridgeline Mount
- Ensuring Stability and Durability of the Ridgeline Mount
- Compatibility with different roof types and configurations of Starlink Ridgeline Mount
- Conclusion
Understanding Starlink Internet and uses of Mounting Solutions
Fast and dependable broadband connectivity is offered by the innovative satellite internet service company Starlink, a SpaceX subsidiary. Starlink was first established to provide services to consumers in the United States, but it has quickly broadened its reach to include more than a dozen regions worldwide. The business intends to expand its services to every country worldwide as part of its audacious mission.
Satellite internet services have been accessible for a while, with well-known suppliers like HughesNet and Viasat offering them. These providers typically use a similar operating method to connect people to the internet. A satellite, a ground station, and a satellite dish are commonly used in the procedure. The request from your computer is sent from your router to your satellite dish, which then sends it to a satellite when you want to view a website. The satellite sends the request to a ground station, which finds the server hosting the website, locates the appropriate data, and gets it before sending it back to the satellite. Through your dish and router, the satellite finally transmits the data to you.
Starlink Pole Mount Installation and DIY Guide
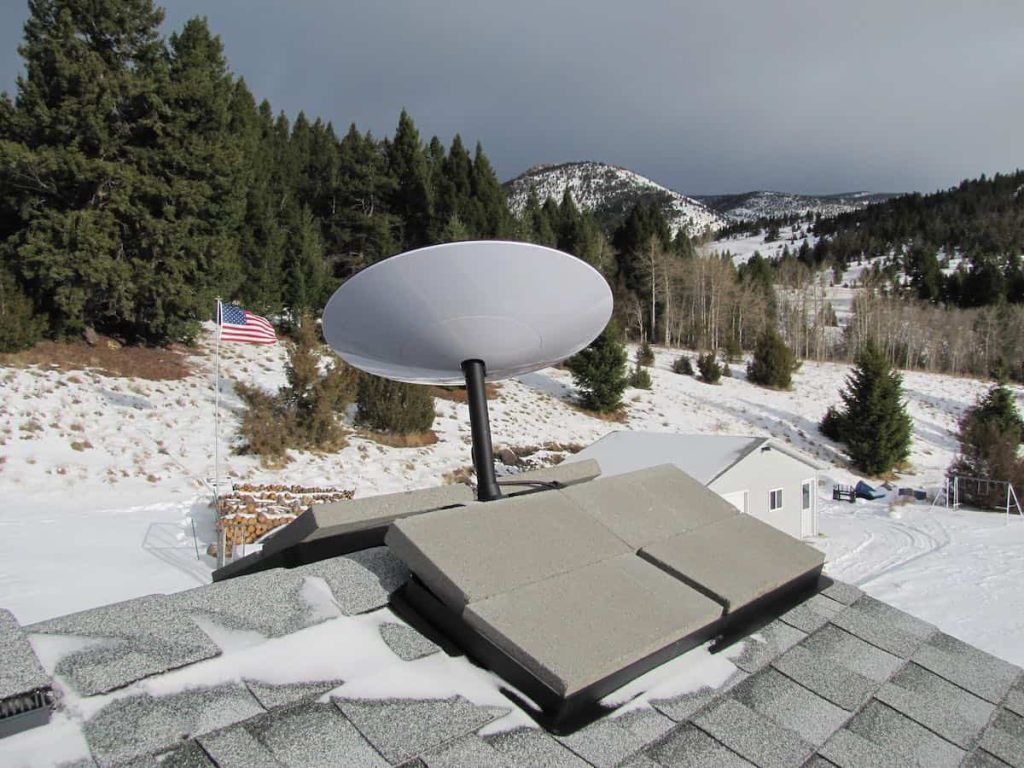
Starlink Ridgeline Mount Overview
An advanced option for roof installation, the Starlink Ridgeline Mount Kit provides adaptability and compatibility with various roof designs, whether pitched or flat. It can be easily put at the ridgeline of a pitched roof, and the mount’s base may be altered to meet various angles. The mount can also be set up to rest safely on a flat roof. The lack of drilling needed for installation only serves to increase its allure. The mount uses Ballast weights to secure it to the roof firmly.
Users with a Residential Starlink and an Roam(RV) Starlink dish will benefit most from this innovative new mount. The Starlink Ridgeline Mount is the perfect option for people who want to ensure that their RV dish is always powered on to ensure firmware updates. It eliminates any worries about possible damage by allowing owners to install their RV unit on their garage roof without having to drill holes. Furthermore, should the necessity arise in the future, the mount’s adaptability makes relocation simple. Users will benefit from this feature’s increased versatility and convenience for their setup.
Starlink Ridgeline Mount Installation Process and Considerations
Here is a brief guide on the installation process of Starlink Ridgeline Mount:
Step 1: Unplug the router
To turn off the Starlink dish, securely unplug your router’s AC power cord. You can then proceed to unplug the Starlink cable and get ready to attach the dish to the new mount without any issues.
Step 2: Transport the Ridgeline Mount to the roof
Conveniently, the Ridgeline Mount is made to be collapsible for simple transportation. Do not attach the weights at this time, remember. Carry the mount to the desired spot on your roof while keeping it folded. It is significant to note that the kit’s travel case is designed for the dish alone, not the mount.
Step 3: Unpack the Mount
Start by anticlockwise turning the center arm knob. This will make the mount more flexible and allow for changes. Place the mount on the roof after carefully unfolding the trays. To ensure stability and a tight fit, check that each side tray is flush with the roof surface. The Ridgeline Mount allows for placement flexibility. Depending on your needs, it can be positioned at the apex of a sloped roof or any place on a flat roof. Concentrate your attention right now on positioning the Starlink dish mast in the center mounting arm. For optimum performance, the mounting arm must be angled at a 5-degree inclination from vertical.
Step 4: Take care of the alignment
Place the mounting arm vertically while the center arm knob is still loose. Make that the alignment is within the allowed range of angles. Turn the center arm knob in a clockwise direction once the desired alignment has been obtained. After this action, all the parts will be firmly tightened and fastened in place. These procedures will help you correctly align the Ridgeline Mount’s mounting arm, ensuring that the Starlink dish mast is oriented correctly and stable.
Step 5: Installation of the weights
Transport each ballast weight individually and carefully to the mount, considering they weigh about 13 lbs. The four ballasts’ combined weight, which is almost 50 lbs., is significant because it gives the mount the stability and solid grounding it needs. Remember that the kit’s carry bag is designed to hold the dish, not the weights.
Step 6: Begin the Routing process
Start by removing the cable from the router and the dish. This guarantees a risk-free and straightforward installation procedure. Run the cable from inside your building to the exterior using the dish connector side. The wall clips in the kit can be used to fasten the cable to the side of your house. This will keep things looking neat and put together. Use the carry bag with your Starlink dish to move it safely. Once there, insert the dish mast into the Ridgeline Mount’s middle arm. It should fit snugly and snap into place.
How To Connect Router To Starlink?
Tips for Optimal Placement and Alignment of Starlink Ridgeline Mount
Achieving ideal positioning and alignment while installing the Starlink Ridgeline Mount is essential for maximizing the functionality of your Starlink system. The following advice will help you attain the most significant outcomes:
- Select an open area: Decide on a location on your roof that offers a clear sky view. Avoid positioning the mount next to any potential satellite signal-interfering objects, such as trees, buildings, or other structures.
- Think about the roof pitch: The Ridgeline Mount can be used on flat and pitched roofs. It is advised to position the mount at the ridgeline for sloped roofs. To create a stable and secure fit, ensure each side tray is flush against the roof surface.
- Align the mounting arm: The Starlink dish mast should be fitted into the center mounting arm, which should be tilted no more than 5 degrees from vertical. The best possible alignment improves signal reception. Use the center arm knob to adjust and tighten the mounting arm securely.
- Safe ballast weights: Using ballast weights improve the mount’s stability. Make sure all four weights are snugly attached and carefully inserted. Over 50 pounds worth of weights hold down and stabilize the mount.
Use the dish connection side of the cable to route it to your router, and attach it with the supplied wall clips to keep it in place. The cable along the side of your house should be securely fastened to avoid any potential harm and to create a tidy appearance. By paying attention to these placement and alignment guidelines, you can ensure that your Starlink Ridgeline Mount is positioned correctly and operating optimally.
Ensuring Stability and Durability of the Ridgeline Mount
Regarding the Ridgeline Mount, it’s crucial to maintain stability and toughness. The following considerations should be taken into account to ensure a safe and durable installation:
- Strong mounting: Whether the roof is flat or slanted, ensure the mount is firmly connected to the surface. Verify again that each side tray provides a solid base by being flush with the roof. This action helps stop the mount from shifting or moving over time.
- Proper weight distribution: Insert all four ballast weights into the mount during installation, and check that they are correctly aligned. This guarantees that the weights evenly distribute the load, giving the mount the stability it needs. Paying attention to the weights’ precise positioning is critical since they play a crucial function.
- Weather resistance: Because the Ridgeline Mount is outdoors, selecting a premium mount that can tolerate a range of weather conditions is critical. Ensure the materials are durable and can survive temperature, wind, and precipitation changes without affecting the mount’s function or stability.
- Regular maintenance and inspection: Check the mount occasionally to ensure it’s still in good shape. Look for any damage, loose parts, or indications of wear. To preserve the stability and toughness of the mount over time, tighten any screws or knobs as necessary and deal with any problems as soon as they arise.
Compatibility with different roof types and configurations of Starlink Ridgeline Mount
J-Mount
Due to its widespread availability, low cost, and versatility, the J-Mount is one of Starlink’s best mounting options. It’s important to note that a J-Mount can already be in your possession from a prior satellite provider, such as Dish Network, making it an easy decision. Choosing a J-Mount with a pipe diameter of around 1.5 inches to use with Starlink, such as the Winegard DS2000A shown above, is advised.
Depending on the J-Mount model selected, a few small changes can be required to connect the J-Mount with the Starlink mounting tube. A straightforward option is to utilize a mount adapter like the Winegard Universal Antenna Mount Adapter in the image.
Flashing-Mount
The flashing mount is a viable option for individuals looking for a professional and hassle-free installation of the Starlink dish on the roof, a popular installation location. The Flashing Mount installs beneath the top layer of shingles and is firmly fastened to the roof structure to offer a safe and watertight solution. This technique offers peace of mind by guaranteeing strength and resistance to leaks.
It’s crucial to remember that a Flashing Mount installation requires additional parts. You will also require a Starlink Pivot Mount or an aftermarket J-Mount in addition to the Flashing Mount. These add-ons must firmly bind the Starlink dish to the Flashing Mount to ensure a sturdy and dependable configuration.
Check out How Starlink Bypass Mode Works.
Conclusion
The Starlink Ridgeline mount kit offers outstanding quality and a simple installation procedure. It is an exceedingly versatile alternative due to its remarkable versatility, which enables it to be compatible with different roof forms, angles, and even flat roofs. The weights are what distinguish the Starlink Ridgeline Mount Kit. This installation offers a cleaner and more practical alternative to numerous aftermarket mounts that call for providing sandbags or concrete blocks for stabilization. The added weights help provide a lower profile installation, streamlining setup and improving overall ease.